
Introduction
First step in the process of penetration testing is “Information gathering”, the phase where it is useful to get as much information about the target(s) as possible. While it might be different for the different type of penetration tests, such as web application or mobile application pentest, network scanning is a crucial step in the infrastructure or network pentest.
Let’s take a simple scenario: you are a penetration tester and a company want to test one of its servers. They send you the IP address of the server. How to proceed? Although nmap allows to easily specify multiple IP targets or IP classes, to keep things simple, I will use a single target IP address which I have the permission to scan (my server): 137.74.202.89.
Why?
To find vulnerabilities in a remote system, you should first find the network services running on the target server by doing a network scan and finding the open ports. A service, such as Apache or MySQL can open one or multiple ports on a server to provide its functionality, such as serving web pages or providing access to a database.
How?
A well-known tool that helps penetration testers to perform network scan is nmap (Network Mapper). Nmap is not just a port-scanner, it is a powerful tool, highly customizable that can also find the services running on a system or even use scrips (modules) to find vulnerabilities.
The easiest way to use nmap is to use the Pentest-Tools web interface which allows anyone to easily perform a network scan.
Let’s see some examples. We want to scan an IP address using nmap. How can we do it? What parameters should we use? We can start with the easiest version:
root@kali:~# nmap 137.74.202.89
Starting Nmap 7.70 ( https://nmap.org ) at 2018-10-16 02:11 EDT
Nmap scan report for rstforums.com (137.74.202.89)
Host is up (0.045s latency).
Not shown: 993 closed ports
PORT    STATE    SERVICE
22/tcp  open     ssh
25/tcp  filtered smtp
80/tcp  open     http
135/tcp filtered msrpc
139/tcp filtered netbios-ssn
443/tcp open     https
445/tcp filtered microsoft-ds
Nmap done: 1 IP address (1 host up) scanned in 2.07 seconds
We can find some useful information:
- We see the nmap version and start time of the scan
- We can see the domain name of the IP address: rstforums.com
- We can see that host is up, so nmap checked this
- We can see that 993 ports are closed
- We can see that 7 ports are open or filtered
However, even if the default scan can be very useful, it might not provide all the information we need to perform the penetration test on the remote server.
Nmap options
Checking the options of nmap is the best place to start. The “nmap -h” command will show us the command line parameters grouped in multiple categories: target specification, host discovery, scan techniques, port specification, version/service detection, OS scan, script scan, performance, firewall evasion and output. It is possible to easily find detailed information about all options by using the “man nmap” command.
Let’s see what common options might be useful, from each category.
- Target specification – Since we have a single IP address as a target, there is no need to load it from a file (-iL), we will specify it in the command line.
- Host discovery – These options are useful when there are a lot of target IP addresses and can help to reduce the scan time by checking if the target IP addresses are online. It does this by sending multiple different packets, but it can miss some of them. Since in our case there is a single target IP address, we can disable the host discovery by using the “-Pn” argument.
- Scan techniques – It is possible to scan using multiple techniques. First, it is important to know what to scan for: TCP, UDP or both. The most common services are running on TCP, but in a penetration test UDP ports must not be forgotten. It is possible to scan for UDP ports using “-sU” command line option and for TCP, there are two common scan techniques: SYN scan (“-sS” option) and Connect scan (“-sT” option).
- Port specification – After we decide what scan technique to use, we have to mention the ports we want to scan. This can be easily achieved with “-p” option. By default, nmap scans the most common 1000 ports. However, to be sure, we can scan all ports (1-15535) using “-p-“ option.
- Service/version detection – Even if finding open ports is a good start, finding which service and which service version are running on the target system would help more. This can be easily achieved by using the “-sV” option.
- OS detection – It might be useful to also know which Operating System is running on the target system and specifying the “-O” option will instruct nmap to try to find it out.
- Script scan – With the previous options we can find which services are running on the target system. However, why not to get more information about them? Nmap has a large amount of scripts that can get additional information about them. Please note that some of them might be “intrusive”, so we need the permission before scanning a target.
- Performance – This category allows us to customize the speed of the scan. There are a few timing templates that can be used with “-T” parameter, from “-T0” (paranoid mode) to “-T5” (insane mode). A recommended value would be “-T3” (normal mode) and if network connectivity is good, “-T4” (aggressive mode) can be used as well.
- Firewall evasion – There are multiple options which specify different techniques that can be used to avoid firewalls, however, for the simplicity we will not use them here.
- Output – What happens if you scan for a long time and your system crashes? What if you close the Terminal by mistake and not check the scan result? You should always save the output of the scan result! The “-oN” saves the normal output, “-oX” saves the output as XML or “-oG” saves it in “greppable” format.
- Other options – It is also very useful to know what’s happening if a long-time scan is running an “-v” can improve verbosity and keep you up to date. If there are a lot of targets, by using “–open” you will only get the open ports as output and it can improve your scan read time. It is possible to also resume a scanning session (if output was saved) using “–resume” option and “-A” (aggressive) can turn on multiple scan options by default: “-O -sC -sV” but not “-T4”.
During a penetration test all ports must be scanned. A possible nmap command to do it would be the following:
nmap -sS -sU -p- -sC -sV -O -Pn -v -oN output 137.74.202.89
However, it will take some time, so a good suggestion is to run a shorter scan first, scan for example only most common 100 or 1000 TCP ports and after this scan is finished, start the full scan while working with the result of this scan. Below is an example, where “–top-ports” option choses the most common 1000 ports.
nmap -sS --top-ports 1000 -sC -sV -v -Pn -oN output 137.74.202.89
TCP vs UDP scan
While doing a network scan, it is useful to understand the differences between TCP and UDP protocols.
UDP protocol is very simple, but it does not offer the functionalities that TCP offers. The most useful features of TCP are the following:
- It requires an initial connection, in 3 steps, also called “3-way handshake”:
- Client sends a packet with the SYN flag (a bit in the TCP header) set
- Server replies with the SYN and ACK flags set (as mentioned in the TCP standard, this can also be done in two packets, but it’s easier to combine them in a single packet)
- Client confirms using an ACK flag set packet.
- Each packet sent to a target is confirmed by another packet, so it is possible to know if the packed reached the destination or not
- Each packet has a number, so it is sure that the packets are processed at the destination in the same order as they were sent
The initial connection is important to be understood in order to understand the difference between the two common TCP scans: SYN scan (-sS) vs Connect (-sT) scan. The difference is that the SYN scan is faster, as nmap will not send the last ACK packet. Also, it is important to note that nmap requires root privileges to use SYN scan. This is because nmap need to use RAW sockets, a functionality of the Operating system, to be able to manually create the TCP packets and this needs root privileges. If we run nmap with root privileges, by default it will use SYN scan, if not, It will use Connect scan.
How does it work?
Enough with the theory, let’s see what happens during a SYN and UDP scan. We will use a simple command, to scan for port 80 on both TCP (using SYN scan) and UDP.
# nmap -sS -sU -Pn -p 80 137.74.202.89
Starting Nmap 7.70 ( https://nmap.org ) at 2018-10-17 13:12 EDT
Nmap scan report for rstforums.com (137.74.202.89)
Host is up (0.045s latency).
PORT   STATE  SERVICE
80/tcp open   http
80/udp closed http
Nmap done: 1 IP address (1 host up) scanned in 0.26 seconds
During the scan, we open Wireshark and check for the packets sent using a filter that will show us only the packets sent to our target IP address: “ip.addr == 137.74.202.89”. Below is the result:

We can see the following:
- First three packets are TCP: one with the SYN flag sent by nmap, one with the SYN and ACK flags sent by the target server and one with RST (Reset) flag sent by nmap. As you can see, being a SYN scan, the last packet of the three-way handshake does not exist. This is helpful, because some services, on connection, might log the IP address that connected to them and this type of scan helps us to avoid this issue.
- Last two packets are UDP and ICMP: first packet is the one sent by nmap to the remote port 80, and it received an ICMP message “Destination unreachable (Port unreachable)” which informs us that the port is not open and nmap can show it as closed. However, please note that those packets might not be sent.
Let’s also check for a Connect scan is performed. We can use the following command:
nmap -sT -Pn -p 80 137.74.202.89
Below is the result:

We can see that there are four packets:
- First three packets represent the three-way handshake used to initiate the connection.
- Last packet is sent to close the connection
What happens if the port is closed? We will change the port to a random one: 1337

There are two packets:
- First packet is the SYN packet sent by nmap to initiate the connection
- Second packet is the RST packet received, meaning that the port is not opened
However, if a firewall is used, it might be possible to not receive the RST packet.
Service version
Service version option (-sV) allows us to find out what is running on the target port. This depends on the service running there. However, let’s see some examples of requests that nmap will use to find what is running on port 80, which is an Apache web server.
# nmap -sS -Pn -p 80 -sV 137.74.202.89
Starting Nmap 7.70 ( https://nmap.org ) at 2018-10-17 14:05 EDT
Nmap scan report for rstforums.com (137.74.202.89)
Host is up (0.043s latency).
PORT   STATE SERVICE VERSION
80/tcp open  http    Apache httpd
Service detection performed. Please report any incorrect results at https://nmap.org/submit/ .
Nmap done: 1 IP address (1 host up) scanned in 6.98 seconds
Below is a list of HTTP requests sent by nmap:
GET / HTTP/1.0
GET /nmaplowercheck1539799522 HTTP/1.1
Host: rstforums.com
Connection: close
User-Agent: Mozilla/5.0 (compatible; Nmap Scripting Engine; https://nmap.org/book/nse.html)
POST /sdk HTTP/1.1
Host: rstforums.com
Content-Length: 441
Connection: close
User-Agent: Mozilla/5.0 (compatible; Nmap Scripting Engine; https://nmap.org/book/nse.html)

<soap:Envelope xmlns:xsd="http://www.w3.org/2001/XMLSchema" xmlns:xsi="http://www.w3.org/2001/XMLSchema-instance" xmlns:soap="http://schemas.xmlsoap.org/soap/envelope/"><soap:Header><operationID>00000001-00000001</operationID></soap:Header><soap:Body><RetrieveServiceContent xmlns="urn:internalvim25"><_this xsi:type="ManagedObjectReference" type="ServiceInstance">ServiceInstance</_this></RetrieveServiceContent></soap:Body></soap:Envelope>
GET /HNAP1 HTTP/1.1
Host: rstforums.com
Connection: close
User-Agent: Mozilla/5.0 (compatible; Nmap Scripting Engine; https://nmap.org/book/nse.html)
GET / HTTP/1.1
Host: rstforums.com
GET /evox/about HTTP/1.1
Host: rstforums.com
Connection: close
User-Agent: Mozilla/5.0 (compatible; Nmap Scripting Engine; https://nmap.org/book/nse.html)
Script scan
If we enable the script scan (-sC), the number of requests increases as it will use multiple “scripts” to find more information about the target. Let’s take the following example:
# nmap -sS -Pn -p 80 -sC 137.74.202.89
Starting Nmap 7.70 ( https://nmap.org ) at 2018-10-17 14:14 EDT
Nmap scan report for rstforums.com (137.74.202.89)
Host is up (0.045s latency).
PORT   STATE SERVICE
80/tcp open  http
|_http-title: Did not follow redirect to https://rstforums.com/
Nmap done: 1 IP address (1 host up) scanned in 1.50 seconds
Below is the Wireshark output, using a filter that matches only the HTTP requests sent:
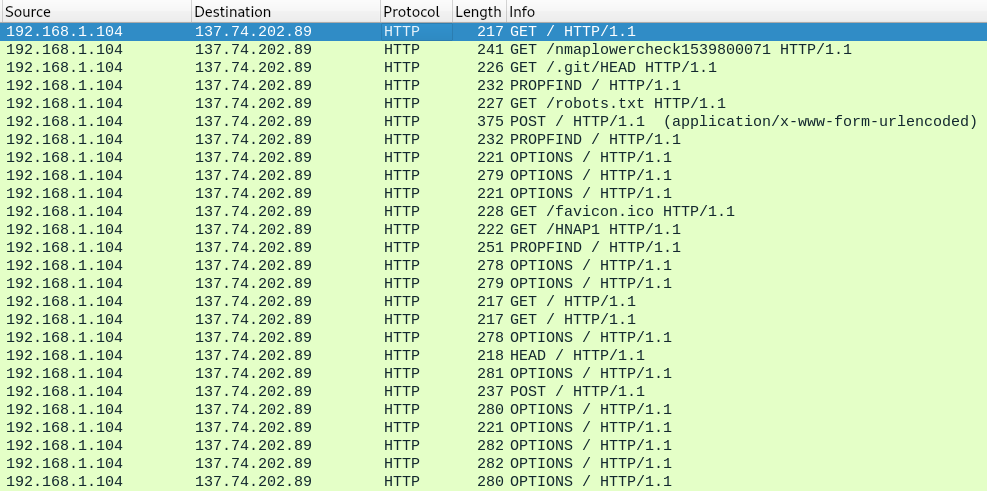
As you can see, nmap scripts will send several HTTP requests useful to find more information about the application running on the web server. For example, it will send a request to find if “.git” directory is present, which can contain source code, it sends a request to get “robots.txt” file which might lead to additional paths and one script even sends a POST request to find if there is a RPC (Remote Procedure Call) aware service running:
POST / HTTP/1.1
Connection: close
User-Agent: Mozilla/5.0 (compatible; Nmap Scripting Engine; https://nmap.org/book/nse.html)
Content-Type: application/x-www-form-urlencoded
Content-Length: 88
Host: rstforums.com

<methodCall> <methodName>system.listMethods</methodName> <params></params> </methodCall>
Conclusion
Nmap is most often seen as a “port scanner”. However, in the right hands, in the hands of someone that properly understands how it works, it turns into a powerful penetration testing tool.
This article highlights some of the most common and useful features of nmap, but for a comprehensive understanding of the tool it is required to read the manual and actually use it.

Thanks! Keep up the good work!